HighLevel Contacts 101: The Complete Guide to Creating and Managing Contacts

Key Takeaways
- 1. How to Create a New Contact in HighLevel
- 2. Understanding the Contact Record
- 3. How to Edit an Existing Contact
- 4. How to Delete a Contact (and What Gets Removed)
- 5. Creating Custom Fields for Your Business
Creating your first HighLevel contact is the single most important step you’ll take inside the platform. Everything else — your funnels, your email campaigns, your workflows, your pipeline — depends on having contacts in the system. If you’re just getting started with HighLevel and wondering where to begin, this is it. In this guide, I’ll walk you through every way to create, edit, and manage contacts so you can start building real relationships from day one.
1. How to Create a New Contact in HighLevel
Adding a contact manually is the fastest way to get someone into your system. Whether you just got off a discovery call or met someone at a networking event, here’s exactly how to do it.
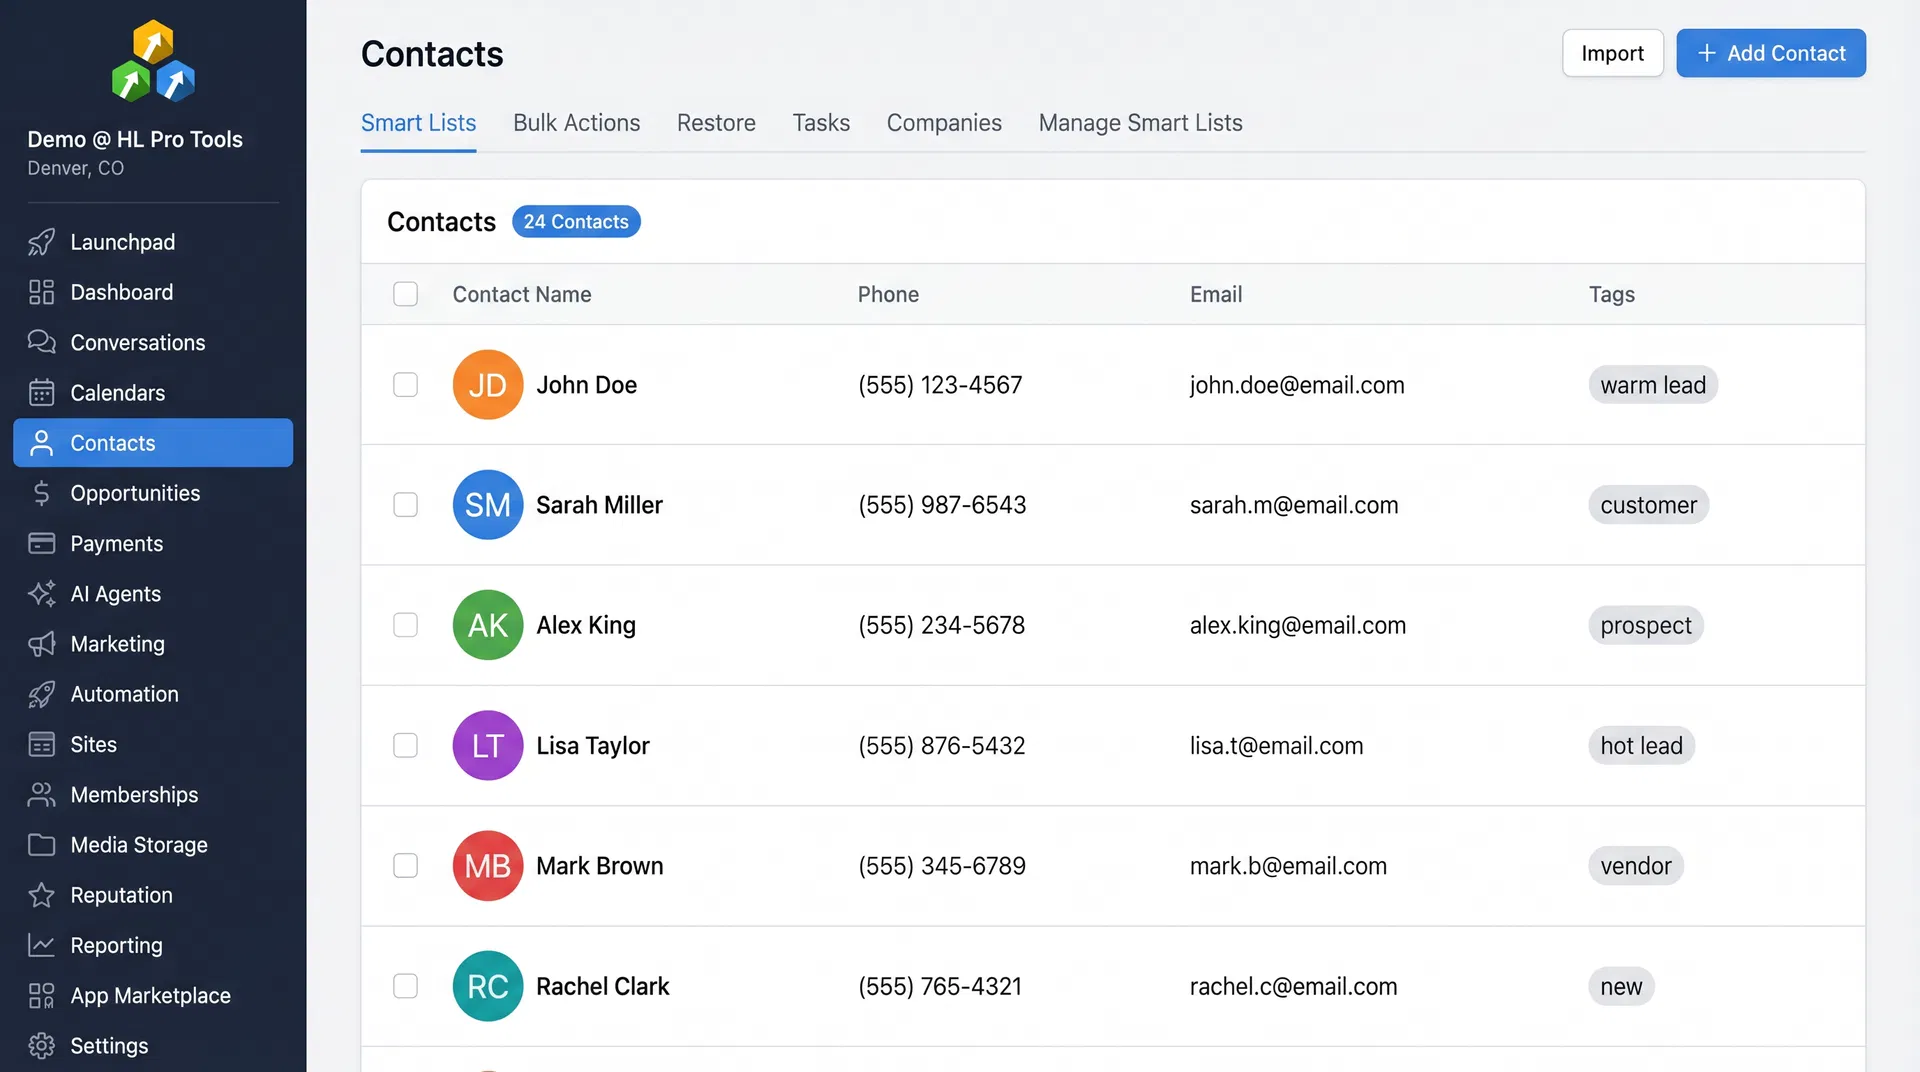
- Navigate to Contacts — Click “Contacts” in the left sidebar. This opens your full contact database with all your existing leads and customers.
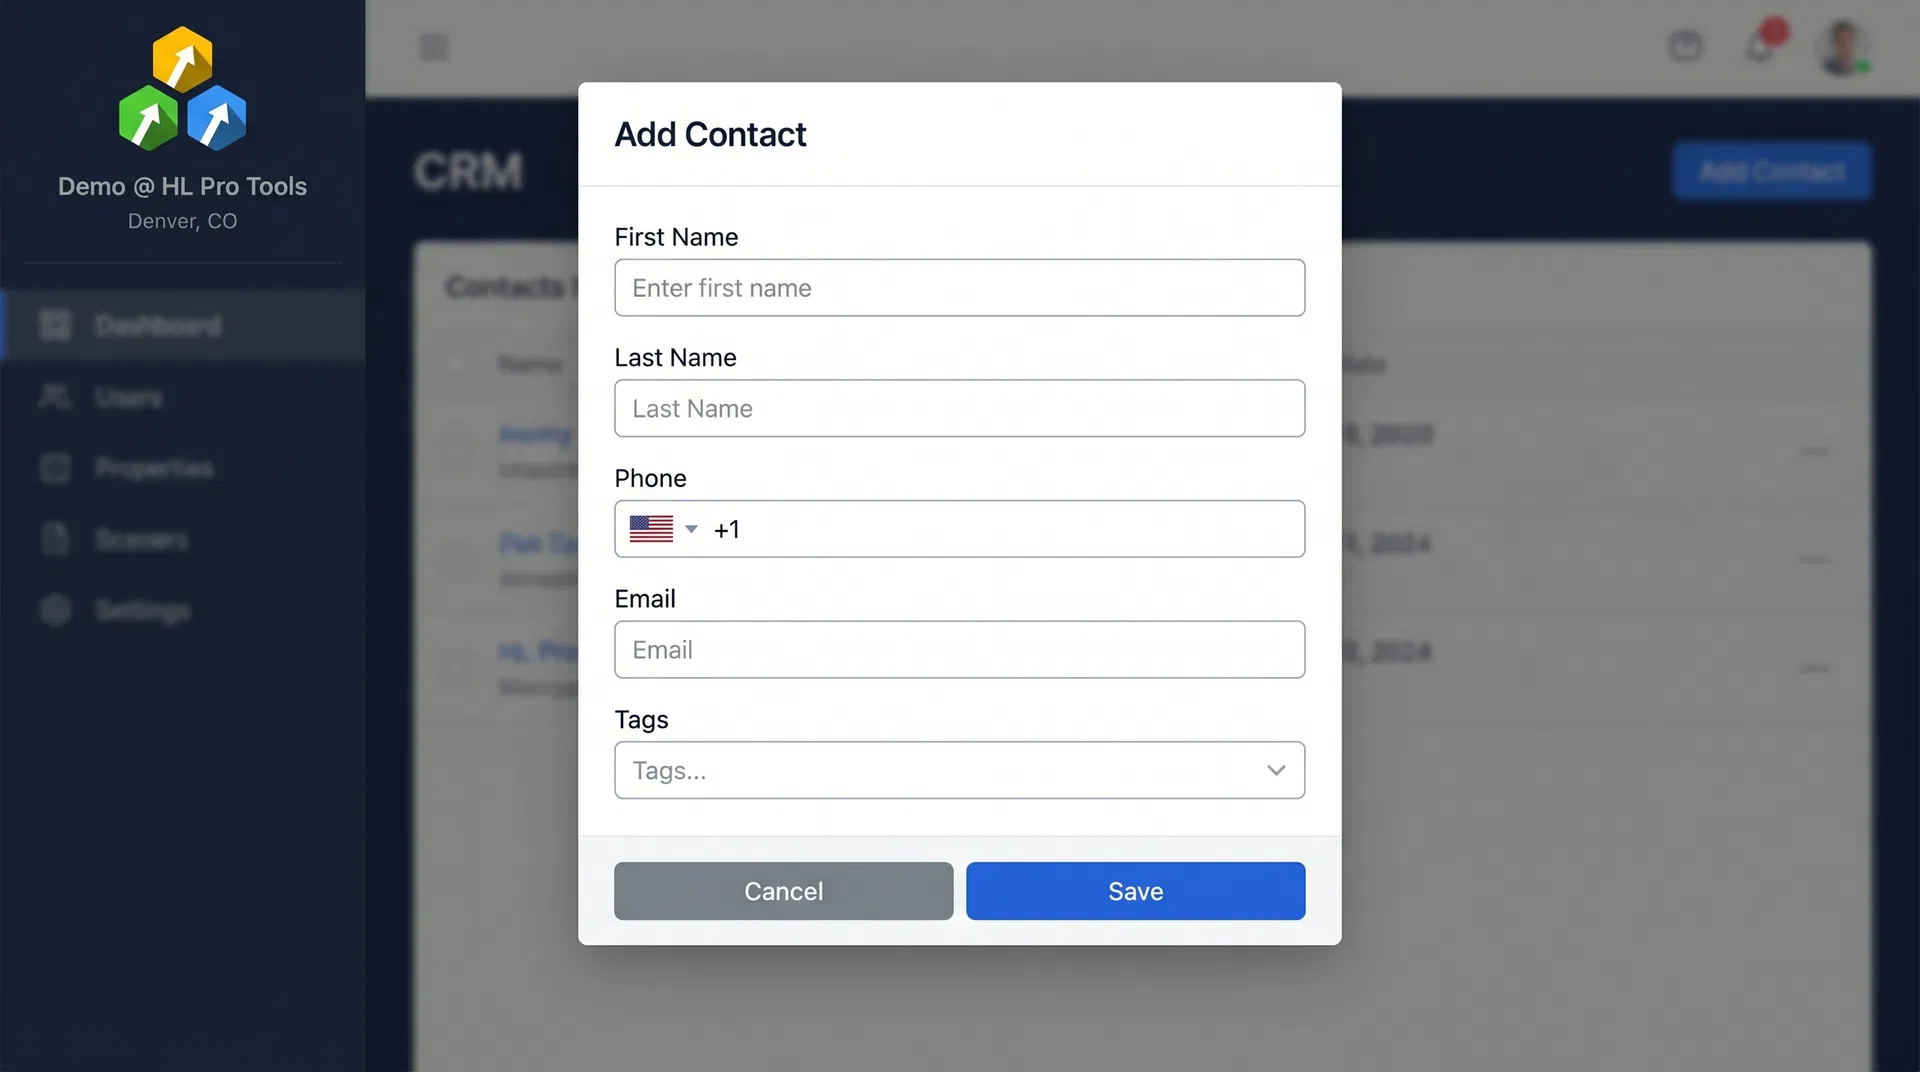
- Click “Add Contact” — You’ll find this button in the top-right corner of the Contacts page. It opens a new contact form where you can enter all the relevant details.
- Enter the contact details — Fill in the fields that matter most: first name, last name, email address, and phone number at minimum. The more information you provide here, the easier it will be to personalize your outreach later.
- Click “Save” — That’s it. Your new contact is now in the system and ready for engagement.
The contact form includes standard fields like name, email, phone, company name, and address. But don’t worry if you need to track something more specific — I’ll cover custom fields in a later section.
What Happens After You Save
As soon as you save a new contact, HighLevel does a few things behind the scenes. First, it checks whether a contact with that email or phone number already exists. If it finds a match, it will flag a potential duplicate rather than creating a second record. If it’s a genuinely new contact, the record is created and immediately available across the entire platform.
This means the contact is instantly available in your pipeline, your conversations inbox, your calendar, and any workflow triggers that fire on contact creation. If you’ve set up a “New Contact Created” workflow trigger, it will fire the moment you click Save. This is powerful — you can automatically send a welcome SMS, assign a task to your sales team, or add the contact to a nurture sequence without any manual follow-up.
Pro Tip: You don’t always need to create contacts manually. When someone fills out a form, completes a survey, or books a calendar appointment in HighLevel, a new contact is automatically created with whatever information they provided. This means your lead capture funnels are already building your contact list for you.
2. Understanding the Contact Record
Once you’ve created a contact, HighLevel builds a full profile for that person. This isn’t just a name and email sitting in a spreadsheet — it’s a living record that tracks every interaction.
What’s Inside a Contact Record
Every contact record in HighLevel contains several key sections that give you a complete picture of who you’re dealing with:
- Contact Details — The basics: name, email, phone, address, company name, and any custom fields you’ve added
- Conversations — Every SMS, email, Facebook message, Instagram DM, and WhatsApp message in one unified thread
- Opportunities — Any deals or pipeline stages associated with this contact
- Appointments — Scheduled calendar bookings tied to this person
- Tasks — Follow-up items and to-dos assigned to this contact
- Notes — Internal notes your team has added about this person
- Activity Log — A timeline of every action taken on or by this contact

This unified view is one of HighLevel’s biggest advantages over traditional CRMs. Instead of switching between tabs and tools, everything about a contact lives in one place.
The Conversation Timeline
The conversation section deserves special attention because it’s where most of your daily interaction happens. HighLevel pulls every communication channel into a single thread — SMS messages, emails, Facebook Messenger, Instagram DMs, Google Business Messages, WhatsApp, and even phone call recordings. You can see the entire history of your relationship with a contact without switching between platforms.
This is a game-changer for teams. If one team member had a phone call with a lead last week and another team member is following up today, they can see the full context without asking “what did we talk about?” The conversation timeline eliminates the information gaps that kill deals in most businesses.
The Activity Log
The activity log tracks every system event related to a contact — when they were added to a workflow, when an email was sent, when they opened it, when they clicked a link, when they booked an appointment, when a tag was added or removed. Think of it as an audit trail for the entire customer journey. It’s invaluable for troubleshooting (“why didn’t this person get my email?”) and for understanding engagement patterns.
3. How to Edit an Existing Contact
Contact information changes. People switch email addresses, get new phone numbers, or move to different companies. Here’s how to keep your records current.
- Navigate to Contacts — Open the Contacts section from the left sidebar.
- Click on the contact row — This opens the contact card for the person you want to edit.
- Update the fields — On the left-hand side of the contact card, you’ll see all the editable fields. Change whatever needs updating — name, email, phone, tags, custom fields, or any other data point.
- Click “Save” — Your changes are saved immediately and reflected across all workflows, campaigns, and conversations tied to this contact.
One thing to keep in mind: if you change a contact’s email address, any active email sequences will start using the new address on the next send. The same applies to phone numbers and SMS campaigns. HighLevel always uses the most current information.
Editing in Bulk
If you need to update the same field across multiple contacts — say, adding a tag to everyone who attended a webinar, or changing the assigned user for a batch of leads — you don’t need to edit each contact individually. Use the bulk actions feature (covered in Section 8) to make changes across your entire selection at once. This saves enormous amounts of time when you’re managing a growing database.
4. How to Delete a Contact (and What Gets Removed)
Sometimes you need to clean house. Maybe a contact was a test entry, a duplicate, or someone who explicitly asked to be removed. Here’s how to delete a contact — and what you need to know before you do.
- Navigate to Contacts — Open the Contacts section from the left sidebar.
- Select the contact — Use the checkbox to the left of the contact’s name. You can select multiple contacts for bulk deletion.
- Click “Delete” — The delete button appears in the action bar above the contact list.
- Confirm the deletion — Type “DELETE” in the confirmation popup and click the Delete button.
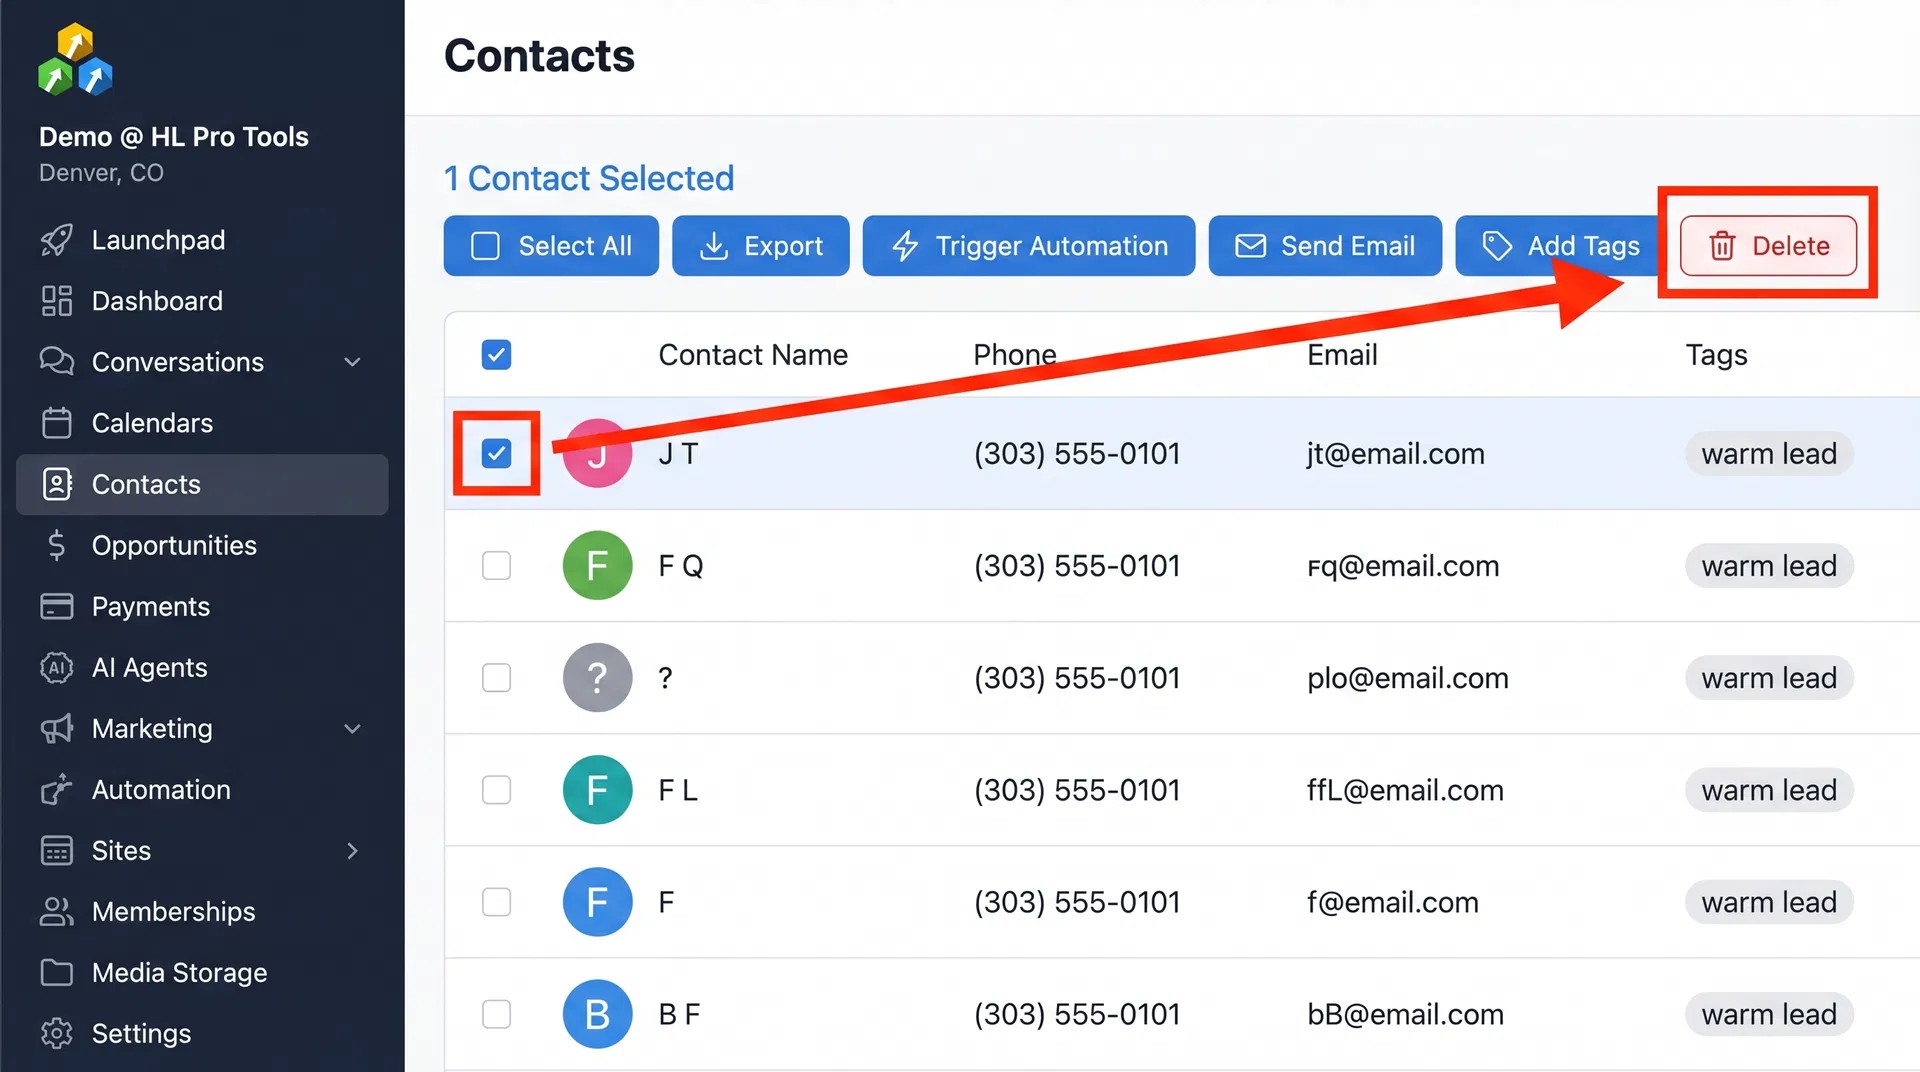
Warning: Deleting a contact also removes all associated data — conversations, notes, opportunities, tasks, appointments, manual actions, and community group ownership. It also stops any active campaigns and workflows for that contact. Make sure you really want to delete before confirming.
The good news is that deleted contacts can be restored within 2 months. After that window closes, the deletion is permanent. To restore a deleted contact, navigate to Contacts > Restore tab and find the contact you want to bring back.
5. Creating Custom Fields for Your Business
The standard contact fields (name, email, phone, address) cover the basics, but every business has unique data it needs to track. That’s where custom fields come in. Custom fields let you add any type of data to your contact records — from “Preferred Communication Channel” to “Annual Revenue” to “T-Shirt Size.”
How to Create a Custom Field
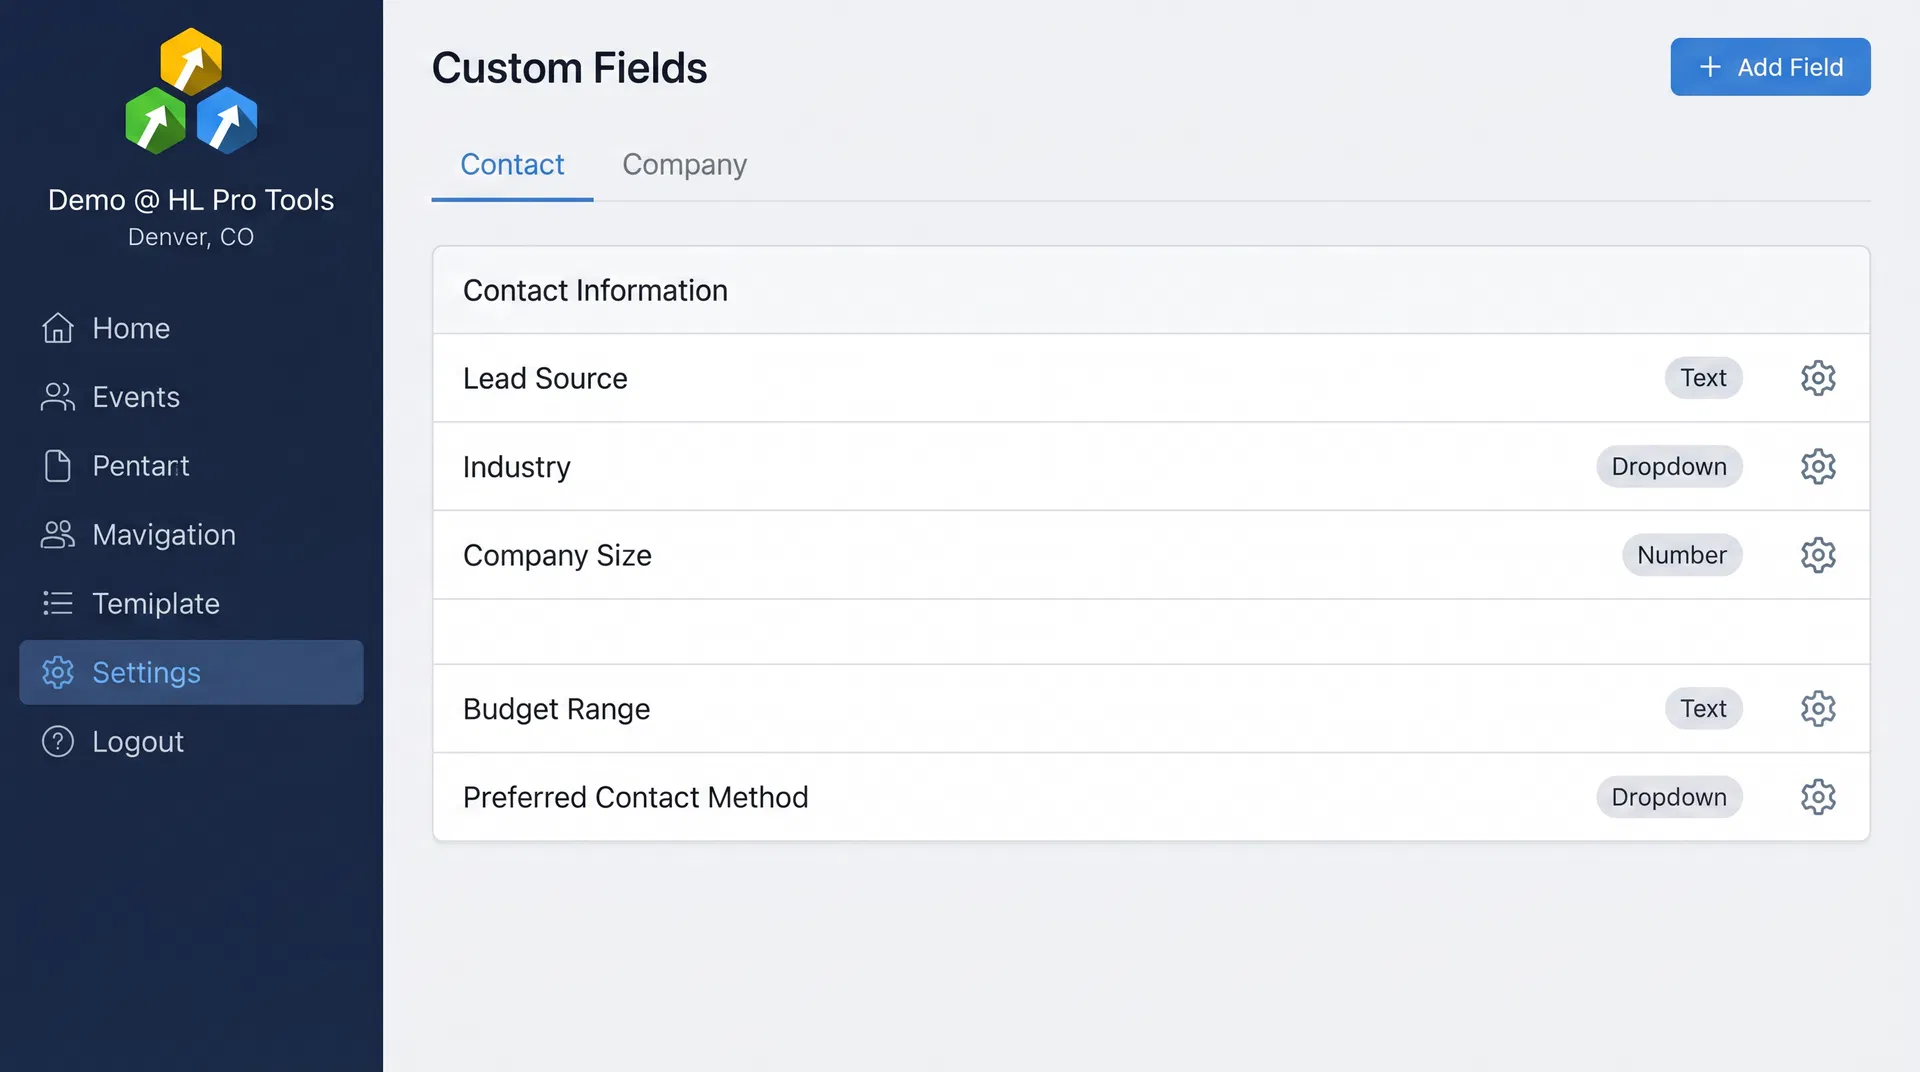
- Navigate to Settings > Custom Fields — You’ll find this under the Settings menu in the left sidebar.
- Click “Add Field” — This opens the field creation panel.
- Choose your field type — HighLevel offers several types: single-line text, multi-line text, number, phone, monetary, dropdown, checkbox, radio select, date picker, file upload, and more.
- Fill in the field details — Give it a clear name, assign it to a group (for organization), and add placeholder text if needed.
- Click “Save” — Your new custom field is now available on every contact record.
Tired of Being the Admin, the Marketer, and the Closer?
You didn't start your business to spend hours building funnels, managing calendars, and chasing follow-ups inside HighLevel. What if someone else handled all of that for you?
Our HighLevel-trained virtual assistants know the platform inside and out — workflows, pipelines, social scheduling, reporting — so you can focus on closing deals and growing your business. Starting at only $164 per week.
Custom Field Best Practices
After setting up custom fields for dozens of HighLevel accounts, here are the patterns that work best:
- Use dropdown fields for standardized data — If there are only a few valid options (like “Lead Source: Facebook, Google, Referral, Other”), use a dropdown instead of a text field. This prevents inconsistent entries and makes filtering much easier.
- Group related fields together — HighLevel lets you organize custom fields into groups. Use this to keep things clean — one group for “Business Info,” another for “Qualification Data,” another for “Preferences.”
- Name fields clearly — Your team members need to understand what goes in each field without guessing. “Revenue” is ambiguous. “Annual Revenue (USD)” is clear.
- Don’t create fields you won’t use — Every empty field is clutter. Start with the 5-10 custom fields you actually need, and add more as your processes evolve.
6. Automatic Contact Creation: Forms, Surveys, and Calendars
Manual contact creation is useful, but the real power of HighLevel is automatic lead capture. Every time someone interacts with one of your forms, surveys, or booking calendars, a new contact is created automatically.
How Automatic Contact Creation Works
When a new lead fills out a form on your funnel or website, HighLevel checks if a contact with that email or phone number already exists. If it does, the existing contact record is updated with any new information. If it doesn’t, a brand new contact is created.
This applies to:
- Forms — Any form built in HighLevel’s form builder, whether embedded on your website or hosted on a funnel page
- Surveys — Multi-step survey forms that collect information progressively
- Calendar bookings — When someone books an appointment through your HighLevel calendar
- Chat widgets — When a visitor starts a conversation through your website chat
- Manual imports — CSV imports also create contacts (covered in our import guide)
The key benefit here is that you don’t need to manually enter every lead. Your funnels, forms, and booking pages are doing the work for you. All you need to do is make sure those capture points are set up and connected to the right workflows.
Connecting Forms to Workflows
The real magic happens when you connect automatic contact creation to workflows. Here’s a common setup: a lead fills out a form on your landing page. HighLevel automatically creates the contact, then a workflow fires that sends an instant SMS confirmation, adds the contact to a nurture email sequence, creates an opportunity in your sales pipeline, and notifies your sales rep via Slack or email. All of this happens in seconds, with zero manual intervention.
This is the foundation of the “speed to lead” advantage that HighLevel gives you. Studies consistently show that responding to a new lead within 5 minutes dramatically increases your chances of converting them. With automatic contact creation plus workflow triggers, you can respond in under 5 seconds.
Pro Tip: Set up a “New Lead Alert” workflow that sends you a push notification through the HighLevel mobile app whenever a new contact is created from a form submission. This way you can call the lead back within minutes, even when you’re away from your desk.
7. Organizing Contacts with Tags and Smart Lists
Once you start building your contact database, organization becomes critical. HighLevel gives you two powerful tools for this: tags and Smart Lists.
Using Tags
Tags are simple labels you can attach to any contact. They’re flexible and can represent anything — a lead source, a product interest, a lifecycle stage, or a campaign membership. You can add tags manually from the contact card, or automatically through workflows and form submissions.
Some practical tag examples:
- Lead Source tags — “Facebook Ad,” “Google Search,” “Referral,” “Webinar Attendee”
- Interest tags — “Interested in SEO,” “Wants Website Design,” “Asked About Pricing”
- Status tags — “Hot Lead,” “Booked Call,” “Proposal Sent,” “Won,” “Lost”
Using Smart Lists
Smart Lists are saved filter combinations that automatically group contacts based on criteria you define. Unlike tags (which are manually or workflow-applied), Smart Lists are dynamic — contacts automatically appear or disappear based on whether they match the filter rules.
For example, you could create a Smart List called “Hot Leads This Month” that filters for contacts who were created in the last 30 days AND have the tag “Hot Lead” AND have an email address. As new contacts match those criteria, they automatically show up in the list.
8. Bulk Contact Actions
When you’re managing hundreds or thousands of contacts, doing things one at a time isn’t practical. HighLevel’s bulk actions let you perform operations on multiple contacts simultaneously.
How to Use Bulk Actions
- Navigate to Contacts — Open the Contacts section.
- Apply filters — Use the filter options to narrow down to the contacts you want to act on.
- Select contacts — Use the checkboxes to select individual contacts, or use the “Select All” checkbox to grab everyone in the current view.
- Choose your action — The bulk action toolbar appears above the list. Options include: Add/Remove Tags, Add to Campaign, Add to Workflow, Send SMS, Send Email, Delete, and Export.
Bulk actions are especially useful for cleanup tasks — like removing a tag from 500 contacts who completed a campaign, or adding all contacts from a specific source to a new workflow.
Common Bulk Action Scenarios
Here are the bulk actions I use most frequently when managing HighLevel accounts:
- Post-webinar tagging — After a webinar, filter by the “Webinar Registered” tag, then bulk-add a “Webinar Attended” or “Webinar No-Show” tag based on attendance data. This lets you trigger different follow-up sequences for each group.
- Campaign cleanup — When a campaign ends, filter for contacts with the campaign tag and bulk-remove it. This keeps your tag list clean and prevents confusion on future campaigns.
- Pipeline reassignment — If a sales rep leaves or you’re restructuring your team, use bulk actions to reassign all their contacts to a new rep in one click.
- Re-engagement campaigns — Filter for contacts who haven’t had any activity in 90+ days, then bulk-add them to a re-engagement workflow to win back cold leads.
Frequently Asked Questions
What information do I need to create a contact in HighLevel?
At minimum, you need either an email address or a phone number. HighLevel uses these as unique identifiers. However, the more information you provide (name, company, address, custom fields), the more effective your personalization and segmentation will be.
Can I import contacts from another CRM into HighLevel?
Yes. HighLevel supports CSV imports for bulk contact migration. Export your contacts from your current CRM as a CSV file, then use the Import feature in HighLevel’s Contacts section to map your columns to HighLevel fields. You can import up to 50MB of contact data at a time.
What happens when a duplicate contact is created?
HighLevel uses email and phone number as unique identifiers. If someone fills out a form with an email that already exists in your system, the existing contact record is updated rather than creating a duplicate. You can also manage deduplication preferences in your settings.
Can I recover a deleted contact?
Yes, deleted contacts can be restored within 2 months. Navigate to Contacts > Restore to find and recover deleted contacts. After the 2-month window, the deletion is permanent and the data cannot be recovered.
How many contacts can I have in HighLevel?
There is no hard limit on the number of contacts you can store in HighLevel. Whether you have 100 contacts or 100,000, the platform handles it. However, larger contact databases may benefit from more aggressive segmentation using tags and Smart Lists to keep things manageable.
Do contacts sync across sub-accounts?
No. Contacts are specific to each sub-account (location) in HighLevel. If you need the same contact in multiple sub-accounts, you’ll need to create or import them separately in each one. This is by design — it keeps client data isolated for agencies managing multiple businesses.
Conclusion
Creating and managing contacts in HighLevel is straightforward once you understand the basics. Whether you’re manually adding a single lead after a phone call or letting your funnels automatically build your database, the contact record is the foundation everything else is built on. Custom fields, tags, and Smart Lists give you the organizational power to keep things clean as your database grows.
The next step from here is to start connecting your contacts to workflows and campaigns. Once you have people in the system, you can automate follow-ups, trigger email sequences, and move leads through your pipeline without lifting a finger. Start with the basics — create a few test contacts, set up a custom field or two, and build a simple Smart List. Once you see how the pieces connect, you’ll understand why HighLevel’s contact system is the backbone of everything else the platform can do.
If you’re looking for help setting up your HighLevel account the right way from the start, check out the coaching offer in the sidebar — it’s the fastest way to skip the learning curve and start getting results.
The Complete Operator's Playbook
Weekly strategies from top-performing agencies
Join 5,000+ operators who get weekly tutorials, templates, and strategies that are actually working right now.
Matt @ HLPT
Founder, HL Pro Tools
Matt and his team of 250+ are known for making it easy to win with GoHighLevel. They bundle tools, trainings and team time for a complete solution. You can use them for all your HighLevel needs from white label support to done-for-you fractional marketing services.
Related Articles
HighLevel Import Contacts 101: The Complete Guide to Importing and Managing Your Contact Lists
Learn how to import contacts into HighLevel from CSV files and other CRMs. This complete guide covers file formatting, field mapping, duplic
How To Add a Tag to New Contact List Import in HighLevel
Adding a tag to a contact record is a great way to organize your contacts within HighLevel. When importing a new list of contacts, it is pos
HighLevel Tags Overview
The tag feature is a great way to organize your contacts within HighLevel. Adding and removing tags will help you determine specific actions