How to Slow Drip Existing HighLevel Leads into Campaigns

Key Takeaways
- Move Contact Data into Google Sheets
- Create Zap to HighLevel
- Drip HighLevel Leads In
- Sit Back and Relax
Here’s the scenario: you crushed it on the Facebook campaign and got $0.62 leads into your HighLevel account. Only about 30% scheduled an appointment so you want to have a ringless voicemail (RVM) or phone call to go out to the other 70%. You know how to send a bulk request or send a campaign to all of your leads (or leads with a specific tag) at once but that would create a different headache. Your client would freak if they got 40 people calling them back at the same time so you need a way to add leads to a campaign in a delay – maybe a few every 5 minutes or something like that. The most flexible and automated way to do this is with a Zap to drip your leads into a HighLevel campaign. This is especially helpful for campaigns that involve calls, voicemail drops or a need to respond to texts in a manual manner. This can also be done for new that don’t pre-exist in HighLevel.
What you will need
- Zapier Account
- High Level Account
- Google Account
Move Contact Data into Google Sheets
The entire automation will fire off of new rows being added to a Google Sheet. Before we create that Zap automation, let’s create the Google Sheet and get our lead data into the right spot
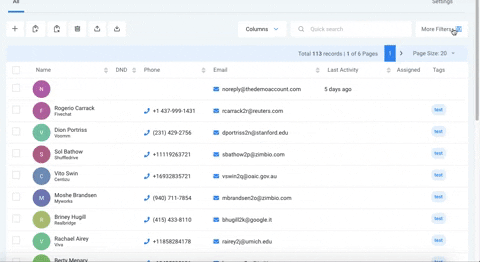
- Export your client list into .csv using Smart Lists (see above GIF)
- Create a Google Sheet with two tabs
- Name the 1st Tab Existing Leads
- Name the 2nd Tab – Drip Campaign
- Copy and paste list from Excel into Existing Leads Tab
- In Drip Campaign Tab, add First Name, Last Name, Email and Drip Column Headers
- Sample Google Doc: https://docs.google.com/spreadsheets/d/1tG02H5j6fdLm5_itdMTQ800PRR55dG12GRrYBQRKg4o/copy
Tired of Being the Admin, the Marketer, and the Closer?
You didn't start your business to spend hours building funnels, managing calendars, and chasing follow-ups inside HighLevel. What if someone else handled all of that for you?
Our HighLevel-trained virtual assistants know the platform inside and out — workflows, pipelines, social scheduling, reporting — so you can focus on closing deals and growing your business. Starting at only $164 per week.
Create Zap to HighLevel
- You will be copying and pasting lead information and drip times into the Drip Campaign Tab to fire this Zap.
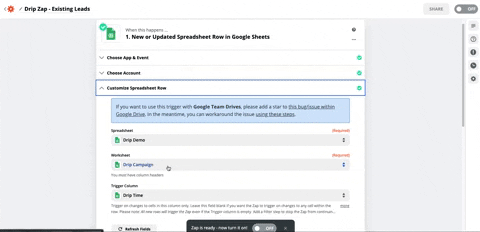
- First Step – New or Updated Row in Google Sheets
- Select your Google Sheet
- Select Drip Campaign Tab
- Select Drip Time Column
- First Step – New or Updated Row in Google Sheets
- Second Step – Create ‘Delay Until’ based on the time in the ‘Drip Time’ column
- Third Step – Add Lead to Campaign in HighLevel
- Select appropriate campaign
- Include email address to ensure contact does not become a duplicate contact (see step 3 in above GIF)
Grab Zap Here: https://zapier.com/shared/0323399b98a36a7baee7b6f047d32fe86dee2882

Drip HighLevel Leads In
- In the existing leads tab, ensure that your columns are in order (First Name, Last Name, Email, Drip Time)
- In the same tab, add the appropriate time and date that you want the lead to enter the campaign (format: DD/MM/YYY 00:00:00) to Drip Time column
- Copy and paste leads into Drip Campaign tab to fire the Zap you created
- It is recommended that you paste 5-8 at a time to ensure Zapier does not miss any new rows
Sit Back and Relax
Your leads will automatically be dripped into the campaign at the desired times.
The Complete Operator's Playbook
Weekly strategies from top-performing agencies
Join 5,000+ operators who get weekly tutorials, templates, and strategies that are actually working right now.
Matt @ HLPT
Founder, HL Pro Tools
Matt and his team of 250+ are known for making it easy to win with GoHighLevel. They bundle tools, trainings and team time for a complete solution. You can use them for all your HighLevel needs from white label support to done-for-you fractional marketing services.
Related Articles
HighLevel Step-by-Step Tutorial: Customizable HighLevel Calendar Notifications
Nothing is more frustrating than getting bombarded with notifications you don’t need. When I check my notifications, I want to see only the
How To Create HighLevel Failed Payment Automation
If you’re trying to setup an automation from Stripe to GoHighLevel, you’re in the right place! There are a number of ways that this can be d
HighLevel Bulk Actions – Campaigns and Workflows
Using HighLevel’s Bulk Actions features in your Contacts/Smart Lists section, you can perform multiple one-off actions to selected or all co